Scheduling toast notifications in a Universal Windows app

Toast notifications are, without any doubt, one of the most used techniques when it comes to notify something to the user, even when the app isn’t running. It’s almost impossible not to miss a toast notification: it plays a sound, it’s displayed on the screen, it’s stored in the Action Center and, on the phone, it makes also the device vibrate.

A toast notification is mapped with a XML file, which describes its content and its behavior. The flexibility in defining a toast notification has been vastly improved in Windows 10, since the Universal Windows Platform has added:

  1. More ways to customize the look & feel of the notification. You can add images, multiple lines of text, etc.
  2. Support to interactive notifications. You can add interactive elements (like buttons or text boxes), which can be handled by a background task.

You can learn more about the new features introduced in the Universal Windows Platform regarding toast notification in the following blog post from the team: http://blogs.msdn.com/b/tiles_and_toasts/archive/2015/07/02/adaptive-and-interactive-toast-notifications-for-windows-10.aspx

In this post I would like to focus on the ways you can send a toast notification, specifically on scheduled toasts, since you may find some challenges in implementing them in the proper way.

Sending toast notifications

There are multiple ways to send a toast notification to the user:

  1. Within the app: the Universal Windows Platform includes APIs like ToastNotification and ToastNotificationManager which can be used to send a toast notification when the app is running in foreground.
  2. From a background task: the same APIs can be used also in a background task, so that toast notifications can be sent also when the app isn’t running.
  3. Push notifications: a toast can be sent by a backend and received also when the app isn’t running. In this case, the app subscribes to a service offered by Microsoft (called WNS) and receives back a Url, which identifies the unique channel for that device. When the backend wants to send a push notification to that device, it executes a HTTP POST request to the Url including, in the body, the XML that describes the notification.
  4. Scheduled notifications: by using the same APIs you use within the app you can create a toast notification and schedule it to be displayed at a specific time and date, even if the application isn’t running. This is the scenario we’re going to focus from now on.

Creating a scheduled toast notification

Creating a scheduled toast notification is easy and you leverage the same APIs you would use for a standard toast notification sent by the app or by a background task. Here is a sample code:

private void OnScheduleToast(object sender, RoutedEventArgs e)
{
    string xml = @"<toast>
            <visual>
            <binding template=""ToastGeneric"">
                <text>Hello!</text>
                <text>This is a scheduled toast!</text>
            </binding>
            </visual>
        </toast>";

    XmlDocument doc = new XmlDocument();
    doc.LoadXml(xml);

    ScheduledToastNotification toast = new ScheduledToastNotification(doc, DateTimeOffset.Now.AddSeconds(10));
    ToastNotificationManager.CreateToastNotifier().AddToSchedule(toast);
}

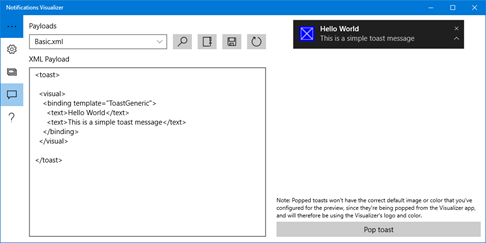
The first step is to define the XML with the toast content. To learn how to define a toast, you can refer to the documentation and you can get some help using Notifications Visualizer, a Windows Store app by Microsoft that is able to give you an instant preview of how a specific XML will be rendered.

snip_20160205175523

Once you have the XML, you need to use it to create a XmlDocument object by calling the LoadXml() method and passing, as parameter, the XML string. Be aware that there are multiple classes called XmlDocument in the Universal Windows Platform: the one required by your scenario belongs to the Windows.Data.Xml.Dom namespace.

The last step is to create a new ScheduledToastNotification object, which is very similar to the basic ToastNotification one. The difference is that, this time, other than the XmlDocument object with the toast definition, you have to specificy also the date and time when the notification will be displayed, using a DateTimeOffset object. In the sample, we’re scheduling the notification to be display after 10 seconds that this code is executed. In the end, we schedule the notification by calling the AddToSchedule() method of the ToastNotifier object, which you can get by calling the CreateToastNotifier() method of the ToastNotificationManager class.

If you don’t like working with XML, you can use the Notifications Extensions library available on NuGet and documented at http://blogs.msdn.com/b/tiles_and_toasts/archive/2015/08/20/introducing-notificationsextensions-for-windows-10.aspx This library gives you a set of classes and methods to create notifications and, under the hood, it takes care of generating the proper XML for you. For example, here is how the previous code looks like using the Notifications Extensions library:

private void OnScheduleToast(object sender, RoutedEventArgs e)
{
    ToastContent toastContent = new ToastContent
    {
        Visual = new ToastVisual
        {
            TitleText = new ToastText
            {
                Text = "Hello!"
            },
            BodyTextLine1 = new ToastText
            {
                Text = "This is a scheduled toast!"
            }
        }
    };

    XmlDocument doc = toastContent.GetXml();

    ScheduledToastNotification toast = new ScheduledToastNotification(doc, DateTimeOffset.Now.AddSeconds(10));
    ToastNotificationManager.CreateToastNotifier().AddToSchedule(toast);
}

Scheduled notifications and locked devices

If you try the previous code on a phone and, before the notification is displayed, you lock it by pressing the power button, you’ll realize that the notification won’t be displayed. As soon as you press the power button again to unlock the phone, you’ll see the notification appearing. What’s happening? The reason is that, by default, apps aren’t allowed to interact with the device when they’re locked, but they require a permission to do that. It’s a typical scenario when you work with background tasks: when you register a new task using the BackgroundTaskBuilder class you define a code similar to the following one:

protected override async void OnNavigatedTo(NavigationEventArgs e)
{
    if (BackgroundTaskRegistration.AllTasks.All(x => x.Value.Name != "ToastTask"))
    {
        BackgroundTaskBuilder builder = new BackgroundTaskBuilder();
        builder.Name = "ToastTask";
        builder.TaskEntryPoint = "ToastsTask.CheckAnswerTask";
        builder.SetTrigger(new ToastNotificationActionTrigger());
        var status = await BackgroundExecutionManager.RequestAccessAsync();
        if (status != BackgroundAccessStatus.Denied)
        {
            builder.Register();
        }
    }
    
}

You can notice that, after defining all the properties of the task (like the name, the entry point and the trigger we want to use) we call the RequestAccessAsync() method of the BackgroundExecutionManager class: only if the request isn’t denied, we move on to perform the real registration. The RequestAccessAsync() method makes sure that:

  1. We don’t have too many background tasks registered. On low memory devices, in fact, there’s a maximum number of tasks that can be registered and, if it has been reached, the OS will deny the request.
  2. The background task is granted access to interact with the device also when it’s locked.

As you can see, the second scenario is the one we need also for our scheduled toast notification: without this approval from the OS, we won’t be able to wake up the phone even if it’s locked. However, there’s a catch: the fact that we’re using scheduled toast notification doesn’t mean that we are necessarly using also a background task in our application. The problem is that, if we try to call the BackgroundExecutionManager.RequestAccessAsync() method without having a background task registered, we’ll get an exception.

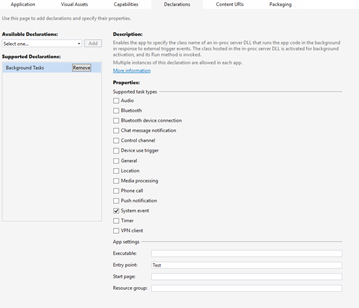
The workaround is simple: register a fake background task. We don’t even need to add a Windows Runtime Component to our project: we just need to declare, in the manifest file, a fake background task. Open the manifest file of your app, go into the Declarations section and, from the dropdown menu, adds the Background task item. Then choose:

  1. As task type, System.
  2. As entry point, any value (for example, Test). It doesn’t have to be a real entry point for a task, since we won’t try to register the task for real.

snip_20160205175826

That’s all: the declaration in the manifet is enough for our scenario, since it will allow the BackgroundExecutionManager.RequestAccessAsync() method to be execute without any error. Now we just have to call this method when the app is starting, for example in the OnNavigatedTo() method of the page:

protected override async void OnNavigatedTo(NavigationEventArgs e)
{
    await BackgroundExecutionManager.RequestAccessAsync();
}

That’s all. Now if you repeat the test of scheduling a notification and locking the phone before it’s displayed, you’ll correctly see the phone waking up and displaying the toast, like if it happens for regular push notifications.

Happy coding!

Posted in Universal Apps, UWP, wpdev | Tagged , | 6 Comments

The MVVM pattern – Design time data

Ok, I’ve broken my promise. I’ve said that the previous post would have been the last one about MVVM, but I’ve changed my mind Smile I realized, in fact, that I didn’t talk about one of the most interesting pros of working with the MVVM pattern: design time data.

Design time data

In one of the posts of the series we’ve talked about dependency injection, which is an easy way to swap the implementation of a service used by ViewModel. There are various reasons to do that: to make refactoring easier, to replace the data source in a quick way, etc. There’s another scenario for which dependency injection can be very useful: helping designers to define the user interface of the application. If this requirement is simple to satisfy when it comes to static data (like the header of a page), which are rendered in real time by the Visual Studio designer, things are a little bit more tricky with dynamic data. It’s very likely that most of the data displayed in the application isn’t static, but it’s loaded when the application is running: from a REST service, from a local database, etc. By default, all these scenarios don’t work when the XAML page is displayed in the designer, since the application isn’t effectively running. To solve this problem, the XAML has introduced the concept of design time data: it’s a way to define a data source that is displayed only when the XAML page is displayed in Visual Studio or in Blend in design mode, even if the app isn’t effectively running.

The MVVM pattern makes easier to support this scenario, thanks to the separation of layers provided by the pattern and the dependency injection approach: it’s enough to swap in the dependency container the service which provides the real data of the app with a fake one, which creates a set of static sample data.

However, compared to the sample we’ve seen in the post about the dependency injection, there are a couple of changes to do. Specifically, we need to detect when the XAML page is being displayed in the designer rather than at runtime and load the data from the correct data source. To do this, we use again one of the features offered by the MVVM Light toolkit, which is a property offered by the ViewModelBase class that tells us if a class is being used by the designer or by the running app.

Let’s see in details the changes we need to do. We’re going to use the same sample we’ve seen in the post about dependency injection, which can be found also on my GitHub repository https://github.com/qmatteoq/UWP-MVVMSamples. The app is very simple: it displays a list of news, retrieved from a RSS feed. In the old post we implemented an interface, called IRssService, which offers a method with the following signature:

public interface IRssService
{
    Task<List<FeedItem>> GetNews(string url);
}

Then, the interface is implemented by two classes: one called RssService, which provides the real data from a real RSS feed, and one called FakeRssService, which provides instead fake static data.

public class RssService : IRssService
{
    public async Task<List<FeedItem>> GetNews(string url)
    {
        HttpClient client = new HttpClient();
        string result = await client.GetStringAsync(url);
        var xdoc = XDocument.Parse(result);
        return (from item in xdoc.Descendants("item")
                select new FeedItem
                {
                    Title = (string)item.Element("title"),
                    Description = (string)item.Element("description"),
                    Link = (string)item.Element("link"),
                    PublishDate = DateTime.Parse((string)item.Element("pubDate"))
                }).ToList();
    }
}

public class FakeRssService : IRssService
{
    public Task<List<FeedItem>> GetNews(string url)
    {
        List<FeedItem> items = new List<FeedItem>
        {
            new FeedItem
            {
                PublishDate = new DateTime(2015, 9, 3),
                Title = "Sample news 1"
            },
            new FeedItem
            {
                PublishDate = new DateTime(2015, 9, 4),
                Title = "Sample news 2"
            },
            new FeedItem
            {
                PublishDate = new DateTime(2015, 9, 5),
                Title = "Sample news 3"
            },
            new FeedItem
            {
                PublishDate = new DateTime(2015, 9, 6),
                Title = "Sample news 4"
            }
        };

        return Task.FromResult(items);
    }
}

Before starting to explore the changes we need to do in the application to support design data, I would like to highlight a possible solution to handle asynchronous operations. One of the challenges in creating fake data comes from the fact that, typically, real services use asynchronous methods (since they retrieve data from a source which may take some time to be processed). The RssService is a good example: since the GetNews() method is asynchronous, it has to return a Task<T> object, so that it can be properly called by our ViewModel using the await keyword. However, it’s very unlikely that the fake service needs to use asynchronous methods: it just returns static data. The problem is that, since both services implement the same interface, we can’t have one service that returns Task operations while the other one plain objects. A workaround, as you can see from the sample code, is to use the FromResult() method of the Task class. Its purpose is to to encapsulate into a Task object a simple response. In this case, since the GetNews() method returns a Task<List<FeedItem>> response, we create a fake List<FeedItem> collection and we pass it to the Task.FromResult() method. This way, even if the method isn’t asynchronous, it will behave like if it is, so we can keep the same signature defined by the interface.

The ViewModelLocator

The first change we have to do is in the ViewModelLocator. In our sample app we have the following code, which registers into the dependency container the IRssService interface with the RssService implementation:

public class ViewModelLocator
{
    public ViewModelLocator()
    {
        ServiceLocator.SetLocatorProvider(() => SimpleIoc.Default);

       
        SimpleIoc.Default.Register<IRssService, RssService>();
        SimpleIoc.Default.Register<MainViewModel>();
    }

    public MainViewModel Main => ServiceLocator.Current.GetInstance<MainViewModel>();
}

We need to change the code so that, based on the way the app is being rendered, the proper service is used. We can ues the IsInDesignModeStatic property offered by the ViewModelBase class to detect if the app is running or if it’s being rendered by the designer:

public class ViewModelLocator
{

    public ViewModelLocator()
    {
        ServiceLocator.SetLocatorProvider(() => SimpleIoc.Default);

        if (ViewModelBase.IsInDesignModeStatic)
        {
            SimpleIoc.Default.Register<IRssService, FakeRssService>();
        }
        else
        {
            SimpleIoc.Default.Register<IRssService, RssService>();
        }

        SimpleIoc.Default.Register<MainViewModel>();
    }

    public MainViewModel Main => ServiceLocator.Current.GetInstance<MainViewModel>();
}

In case the app is being rendered in the designer, we connect the IRssService interface with the FakeRssService class, which returns fake data. In case the app is running, instead, we connect the IRssService interface with the RssService class.

The ViewModel

To properly support design time data we need also to change a bit the ViewModel. The reason is that, when the app is rendered by the designer, isn’t really running; the designer takes care of initializing all the required classes (like the ViewModelLocator or the different ViewModels), but it doesn’t execute all the page events. As such, since typically the application loads the data leveraging events like OnNavigatedTo() or Loaded, we will never see them in the designer. Our sample app is a good example of this scenario: in our ViewModel we have a RelayCommand called LoadCommand, which takes care of retrieving the data from the RssService:

private RelayCommand _loadCommand;

public RelayCommand LoadCommand
{
    get
    {
        if (_loadCommand == null)
        {
            _loadCommand = new RelayCommand(async () =>
            {
                List<FeedItem> items = await _rssService.GetNews("http://wp.qmatteoq.com/rss");
                News = new ObservableCollection<FeedItem>(items);
            });
        }

        return _loadCommand;
    }
}

By using the Behaviors SDK described in this post, we have connected this command to the Loaded event of the page:

<Page
    x:Class="MVVMLight.Advanced.Views.MainView"
    xmlns:interactivity="using:Microsoft.Xaml.Interactivity"
    xmlns:core="using:Microsoft.Xaml.Interactions.Core"
    DataContext="{Binding Source={StaticResource ViewModelLocator}, Path=Main}"
    mc:Ignorable="d">

    <interactivity:Interaction.Behaviors>
        <core:EventTriggerBehavior EventName="Loaded">
            <core:InvokeCommandAction Command="{Binding Path=LoadCommand}" />
        </core:EventTriggerBehavior>
    </interactivity:Interaction.Behaviors>

    <!-- page content here -->

</Page>

However, when the page is being rendered in the designer, the LoadCommand command is never invoked, since the Loaded event of the page is never launched. As such, we have to retrieve the data from our service also in the ViewModel’s constructor which, instead, is executed by the designer when it creates an instance of our ViewModel. However, we need to do it only when the ViewModel is being rendered by the designer: when the app is running normally, it’s correct to leave the data loading operation to the command. To achieve this goal we leverage the IsInDesign property, which is part of the ViewModelBase class we’re already using as base class for our ViewModel:

public MainViewModel(IRssService rssService)
{
    _rssService = rssService;
    if (IsInDesignMode)
    {
        var task = _rssService.GetNews("abc");
        task.Wait();
        List<FeedItem> items = task.Result;
        News = new ObservableCollection<FeedItem>(items);
    }
}

Only if the app is running in design mode, we retrieve the data from the service and we populate the News property, which is the collection connected to the ListView control in the page. Since the GetNews() method is asynchronous and you can’t call asynchronous methods using the async / await pattern in the constructor, you need first to call the Wait() method on the Task and then access to the Result property to get the list of FeedItem objects. In a real application this approach would lead to a synchronous call, which would block the UI thread. However, since our FakeRssService isn’t really asynchronous, it won’t have any side effect.

This sample shows you also the reason why, in case you wanted to make things simpler, you can’t just call the GetNews() method in the constructor also when the application is running: since we’ can’t properly use the async / await pattern, we would end up with unpredictable behaviors. As such, it’s correct to continue calling the data loading methods in the page events that are triggered when the page is being loaded or navigated: since they’re simple methods or event handlers, they can be used with the async and await keywords.

And we’re done!

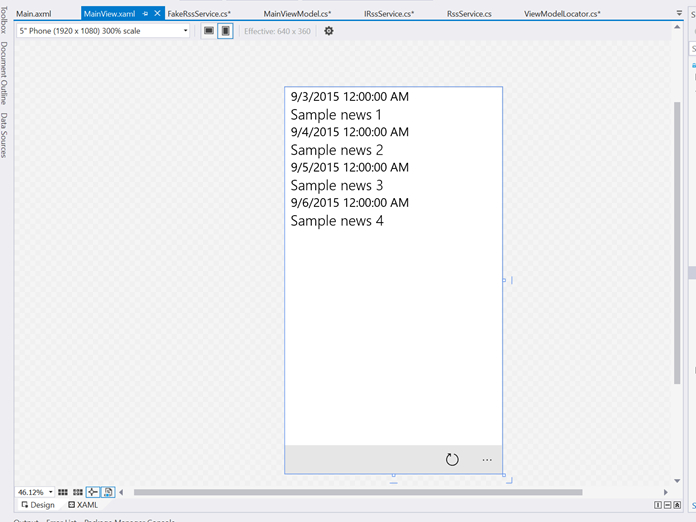
Now the job is done. If we launch the application, we should continue to normally see the data coming from the real RSS feed. However, if we open the MainPage.xaml page in the Visual Studio designer or in Blend, we should see something like this:

snip_20160116230050

The designer has created an instance of our ViewModel, which received from the dependency container a FakeRssService instance. Since the ViewModel is running in design mode, it will excecute the code we wrote in the constructor, which will retrieve the fake data. Nice, isn’t it? Thanks to this implementation, we can easily see how our collection of news will look like and, if it doesn’t satisfy us, easily change the DataTemplate we have defined in the ItemTemplate property.

As usual, you can find the sample code used in this blog post on my GitHub repository: https://github.com/qmatteoq/UWP-MVVMSamples Specifically, you’ll find it in the project called MVVMLight.Advanced. Happy coding!

Introduction to MVVM – The series

  1. Introduction
  2. The practice
  3. Dependency Injection
  4. Advanced scenarios
  5. Services, helpers and templates
  6. Design time data
Posted in Universal Apps, UWP, wpdev | Tagged , , | Leave a comment

The MVVM pattern – Services, helpers and templates

In this last post of the series about MVVM we’re going to introduce some concepts and libraries that can make your life easier when you develop a Universal Windows app leveraging the MVVM pattern.

Services, services and services

In one of the previous posts we have created a sample app to display a list of news retrieved from a RSS feed. While developing the app we introduced the concept of service: a class that takes care of performing some operations and passing the results to the ViewModel. Services can be useful also to reach another important goal of the MVVM pattern: avoiding writing platform specific code directly in the ViewModel, to make it easier to share them with other platforms or applications. As usual, I prefer to explain concepts with real examples, so let’s start with a new one.

Let’s say that you’re developing an awesome application that needs to display a dialog to the user. By applying the knowledge we’ve learned in the previous posts, you’ll probably end up to create a command like the following one:

private RelayCommand _showDialogCommand;

public RelayCommand ShowDialogCommand
{
    get
    {
        if (_showDialogCommand == null)
        {
            _showDialogCommand = new RelayCommand(async () =>
            {
                MessageDialog dialog = new MessageDialog("Hello world");
                await dialog.ShowAsync();
            });
        }

        return _showDialogCommand;
    }
}

The command shows the dialog using a specific API of the Universal Windows Platform, which is the MessageDialog class. Now let’s say that your customer asks you to port this amazing app to another platform, like Android or iOS, using Xamarin, the cross-platform technology that allows to create apps for all the major mobile platforms using C# and the framework .NET. In this scenario, your ViewModel has a problem: you can’t reuse it as it is in Android or iOS, because they use a different API to display a message dialog. Moving platform specific code in a service is the best way to solve this problem: the goal is to change our ViewModel so that it just describes the operation to do (displaying a dialog) without actually implementing it.

Let’s start by creating an interface, which describes the operations to perform:

public interface IDialogService
{
    Task ShowDialogAsync(string message);
}

This interface will be implemented by a real class, which will be different for each platform. For example, the implementation for the Universal Windows Platform will be like the following one:

public class DialogService: IDialogService
{
    public async Task ShowDialogAsync(string message)
    {
        MessageDialog dialog = new MessageDialog(message);
        await dialog.ShowAsync();
    }
}

On Xamarin Android, instead, you will leverage the AlertDialog class, which is specific from Android:

public class DialogService : IDialogService
{
    public async Task ShowDialogAsync(string message)
    {
        AlertDialog.Builder alert = new AlertDialog.Builder(Application.Context);

        alert.SetTitle(message);

        alert.SetPositiveButton("Ok", (senderAlert, args) =>
        {

        });

        alert.SetNegativeButton("Cancel", (senderAlert, args) =>
        {
        });
        alert.Show();

        await Task.Yield();
    }
}

Now that we have moved the platform specific APIs in a service, we can leverage the dependency injection approach (which I’ve described in a previous post) to use, in the ViewModel, the interface instead of the real class. This way, our command will just describe the operation to perform, demanding to the DialogService class to effectively execute it. With this new approach, the ViewModel will add a dependency to the IDialogService class in the constructor, like in the following sample:

public class MainViewModel : ViewModelBase
{
    private readonly IDialogService _dialogService;

    public MainViewModel(IDialogService dialogService)
    {
        _dialogService = dialogService;
    }
}

Then we can change our command in the following way:

private RelayCommand _showDialogCommand;

public RelayCommand ShowDialogCommand
{
    get
    {
        if (_showDialogCommand == null)
        {
            _showDialogCommand = new RelayCommand(async () =>
            {
                await _dialogService.ShowDialogAsync("Hello world");
            });
        }

        return _showDialogCommand;
    }
}


By using the dependency injection approach, the Android application will register in the container the DialogService implementation which uses the Android APIs; vice versa, the Windows 10 application will register, instead, the implementation which uses the UWP APIs. However,now our ViewModel can be shared as it is between the two versions of the application, without having to change it. We can move the ViewModel, for example, in a Portable Class Library, which we can share across the Windows, Xamarin Android, Xamarin iOS, WPF, etc. versions of the application.

To help developers in moving the platform specific code into services, there are many libraries which offer a set of services ready to be used in your applications. One of the best ones, which plays well with MVVM Light, is Cimbalino Toolkit (http://cimbalino.org/), which is specific for the Windows world. Other than many converters, behaviors and helpers classes, it includes a wide set of services to handle storage, settings, network access, etc. All the services are provided with their own interfaces, so that it’s easy to use them with the dependency inection’s approach.

If you want to know more about reusing your ViewModels on different platforms, I strongly suggest you to read this article from Laurent Bugnion, the creator of MVVM Light itself. The tutorial will help you to learn how you can reuse your binding knowledge also on platforms like Android and iOS, which doesn’t support binding out of the box.

Implementing the INotifyPropertyChanged interface in an easy way

In the second post of the series we’ve learned that, to properly support the INotifyPropertyChanged interface, we need to change the way we define the properties in the ViewModel. We can’t use the standard get / set syntax, but in the setter we need to call a method that dispatches the notification to the binding channel that the value has changed. This approach makes the code more “noisy”, since the simple definition of a property requires many lines of code.

Please welcome Fody, a library that is able to change the code you wrote at build time. Fody offers many addons and one of them is called Fody.PropertyChanged. Its purpose is to automatically turn every standard property into a property that, under the hood, implements the INotifyPropertyChanged interface. All you have to do is to decorate your class (like a ViewModel) with the [ImplementPropertyChanged] attribute.

For example, the following code:

[ImplementPropertyChanged]
public class MainViewModel : ViewModelBase
{
    public string Message { get; set; }
}

is converted, during the compilation, into this:

public class MainViewModel: ViewModelBase, INotifyPropertyChanged 
{
    private string _message;

    public string Message 
    {
        get { return _message; }
        set 
        {
            _message = value;
            OnPropertyChanged("Message)
        }
    }
}

This way, you can simplify the code you need to write in your ViewModel and make it less verbose. To use this special attribute, you have to:

  1. Install the package called Fody.PropertyChanged from NuGet (https://www.nuget.org/packages/PropertyChanged.Fody/)
  2. To properly work, Fody requires a special XML file in the root of the project, which describes which is the addon to apply at compile time. The name of the file is FodyWeavers.xml and the content shoudl look like this:
<?xml version="1.0" encoding="utf-8" ?>
<Weavers>
  <PropertyChanged />
</Weavers>

That’s all!

MVVM and Template10

Template10 is a new template, specific for Universal Windows apps development, which has been created to make the developer’s life easier, by providing a cleaner and simpler way to handle the initialization of an app, new controls, MVVM helpers, etc. Template10 is a great starting point also for MVVM apps, since it offers a set of classes that will help you to solve some of the platform specific challenges that may arise during the development, like handling the navigation or the page’s lifecycle. I won’t dig into this topic in this post, since I’ve already talked about it in another post on this blog. If you’re planning to create a Universal Windows app with the MVVM pattern, I strongly suggest you to give it a read and evaluate it.

That’s all folks!

We’ve reached the end of our learning path. I hope you found these series useful to understand the power of the MVVM pattern and that, after reading it, you will try to develop your next application using it. As usual, remember that you can find the samples used as a reference in these posts on GitHub: https://github.com/qmatteoq/UWP-MVVMSamples Happy coding!

Introduction to MVVM – The series

  1. Introduction
  2. The practice
  3. Dependency Injection
  4. Advanced scenarios
  5. Services, helpers and templates
  6. Design time data
Posted in Universal Apps, UWP, wpdev | Tagged , , | Leave a comment

The MVVM pattern – Advanced scenarios

Let’s continue our journey to learn the MVVM pattern and how to apply it to develop a Universal Windows app. In this post we’re going to explore some advanced scenarios which are frequent when you develop a real project: how to handle secondary events, how to exchange message and how to use the dispatcher.

Handling additional events with commands

In the previous posts we’ve learned how all the XAML controls that allow user interaction, like a button, offer a property called Command, which we can use to connect an event to a method without using an event handler. However, the Command property can be used to handle only the main interaction event exposed by the control. For example, if you’re working with a Button control, you can use a command to handle the Click event. However, there are many scenarios where you need to handle secondary events. For example, the ListView control exposes an event called SelectionChanged, which is triggered when the user selects an item from the list. Or the Page class exposes a Loaded event that is triggered when the page is loaded.

To handle these situations we can leverage the Behaviors SDK, which is a library from Microsoft (recently turned into an open source project on GitHub) that contains a set of behaviors ready to be used in your apps. Behaviors are one of the most interesting XAML features, since they allow to encapsulate some logic, which typically should be handled in code behind, in components that can be reused directly in XAML. Behaviors are widely used in MVVM apps, since they help to reduce the code we need to write in the code behind classes.

A behavior is based on:

  1. A Trigger, which is the action that will cause the behavior’s execution.
  2. An Action, which is the action to perform when the behavior is executed.

The Behaviors SDK includes a set of triggers and actions which are specific to handle our scenario: connecting secondary events to commands defined in the ViewModel.

Let’s see a real example. The first step is to add the Behaviors SDK to your project. If you’re working on a Windows / Windows Phone / WPF / Silverlight project, the SDK is included in Visual Studio and it’s available in the Extensions section of the Add reference menu. Otherwise, if you’re working on a Windows 10 app, there’s a new version of the SDK which is available as a NuGet package, like any other library,  and that can be updated independently from Visual Studio and the Windows 10 SDK. To install it, it’s enough to right click on your project, choose Manage NuGet Packages and install the pacakge identified by the id Microsoft.Xaml.Behaviors.Uwp.Managed if it’s a C# / VB.NET application or Microsoft.Xaml.Behaviors.Uwp.Native if it’s a C++ application.

The next step is to declare, in the XAML page, the namespaces of the SDK, which are required to use the behaviors: Microsoft.Xaml.Interactivity and Microsoft.Xaml.Interactions.Code, like in the following sample.

<Page
    x:Class="MVVMLight.Advanced.Views.MainView"
    xmlns:interactivity="using:Microsoft.Xaml.Interactivity"
    xmlns:core="using:Microsoft.Xaml.Interactions.Core"
    mc:Ignorable="d">

</Page>

Thanks to these namespaces, you’ll be able to use the following classes:

  1. EventTriggerBehavior, which is the behavior that we can use to connect a trigger to any event exposed by a control.
  2. InvokeCommandAction, which is the action that we can use to connect a command defined in the ViewModel with the event handled by the trigger.

Here is how we apply them to handle the selection of an item in a list:

<ListView ItemsSource="{Binding Path=News}" 
          SelectedItem="{Binding Path=SelectedFeedItem, Mode=TwoWay}">
    <interactivity:Interaction.Behaviors>
        <core:EventTriggerBehavior EventName="SelectionChanged">
            <core:InvokeCommandAction Command="{Binding Path=ItemSelectedCommand}" />
        </core:EventTriggerBehavior>
    </interactivity:Interaction.Behaviors>
</ListView>

The behavior is declared like if it’s a complex property of the control and, as such, it’s included between the beginning and ending tag of the control itself (in this case, between <ListView> and </ListView>). The behavior’s declaration is included inside a collection called Interaction.Behaviors, which is part of the Microsoft.Xaml.Interactivity namespace. It’s a collection since you can apply more than one behavior to the same control. In this case, we’re adding the EventTriggerBehavior mentioned before which requires, by using the EventName property, the name of the control’s event we want to handle. In this case, we want to manage the selection of an item in the list, so we link this property to the event called SelectionChanged.

Now that the behavior is linked to the event, we can declare which action we want to perform when the event is triggered. We can do it by leveraging the InvokeCommandActionClass, which exposes a Command property that we can link, using binding, to an ICommand property in the ViewModel.

The task is now completed: when the user will select an item from the list, the command called ItemSelectedCommand will be invoked. From a ViewModel point of view, there aren’t any difference between a standard command and a command connected to a behavior, as you can see in the following sample:

private RelayCommand _itemSelectedCommand;

public RelayCommand ItemSelectedCommand
{
    get
    {
        if (_itemSelectedCommand == null)
        {
            _itemSelectedCommand = new RelayCommand(() =>
            {
                Debug.WriteLine(SelectedFeedItem.Title);
            });
        }

        return _itemSelectedCommand;

    }
}

This command takes care of displaying, in the Ouput Windows of Visual Studio (using the Debug.WriteLine() method), the title of the selected item. SelectedFeedItem is another property of the ViewModel which is connected, using binding, to the SelectedItem property of the ListView control. This way, the property will always store a reference to the item selected by the user in the list.

Messages

Another common requirement when you develop a complex app is to find a way to handle the communication between two classes that don’t have anything in common, like two ViewModels or a ViewModel and a code-behind class. Let’s say that, after something happened in a ViewModel, you want to trigger an animation in the View: in this case, the code that will perform it will be stored in the code-behind class, since we’re still talking about code that is related to the user interface.

In these scenarios, the strength of the MVVM pattern (which is a clear separation between the layers) can also become a weakness: how can we handle the communication between the View and ViewModel since they don’t have anything in common, exept for the second being set as DataContext of the first? These situations can be solved by using messages, which are packages that a centralized class can dispatch to the various classes of the application. The most important strength of these packages is that they are completely disconnected: there’s no relationship between the sender and the receiver. By using this approach:

  1. The sender (a ViewModel or a View) sends a message, specifying which is its type.
  2. The receiver (another ViewModel or View) subscribes itself to receive messages which belongs to a specific type.

In the end, a sender is able to send a message without knowing in advance who is going to receive it. Viceversa, the receiver is able to receive messages without knowing the sender. Every MVVM toolkit and framework typically offers a way to handle messages. MVVM Light makes no exceptions; we’re going to use the Messenger class to implement the sample I’ve previously described: starting an animation defined in the code behind from a ViewModel.

The message

The first step is to create the message we want to send from one class to the other. A message is just a simple class: let’s create a folder called Messages (it’s an optional step, it’s just to keep the structure of the project clean) and let’s right click on it in Visual Studio and choose Add –> New item –> Class. Here is how our message looks like:

public class StartAnimationMessage
{

}

As you can see, it’s just a class. In our case it’s empty, since we juts need to trigger an action. It can also have one or more properties in case, other than triggering an action, you need also to send some data from one class to  the other.

The sender

Let’s see now how our ViewModel can send the message we’ve just defined. We can do it by using the Messenger class, included in the namespace GalaSoft.MvvmLight.Messaging. In our sample, we assume that the animation will be triggered when the user presses a button. Consequently, we use the Messenger class inside a command, like in the following sample:

private RelayCommand _startAnimationCommand;

public RelayCommand StartAnimationCommand
{
    get
    {   
        if (_startAnimationCommand == null)
        {
            _startAnimationCommand = new RelayCommand(() =>
            {
                Messenger.Default.Send<StartAnimationMessage>(new StartAnimationMessage());
            });
        }

        return _startAnimationCommand;
    }
}

Sending a message is quite easy. We use the Default property of the Messenger class to get access to the static instance of the messenger. Why static? Because, to properly work, it needs to be the same instance for the entire application, otherwise it won’t be able to dispatch and receive messages coming from different classes. To send a message we use the Send<T>() method, where T is the type of message we want to send. As parameter, we need to pass a new instance of the class we have previously created to define a message: in our sample, it’s the StartAnimationMessage one.

Now the message has been sent and it’s ready to be received by another class.

The receiver

The first step, before talking about how to receive a message, is to define in the XAML page the animation we want to trigger when the button is pressed, by using the Storyboard class:

<Page
    x:Class="MVVMLight.Messages.Views.MainView"
    xmlns="http://schemas.microsoft.com/winfx/2006/xaml/presentation"
    xmlns:x="http://schemas.microsoft.com/winfx/2006/xaml"
    xmlns:local="using:MVVMLight.Messages.Views"
    xmlns:d="http://schemas.microsoft.com/expression/blend/2008"
    xmlns:mc="http://schemas.openxmlformats.org/markup-compatibility/2006"
    DataContext="{Binding Source={StaticResource ViewModelLocator}, Path=Main}"
    mc:Ignorable="d">

    <Page.Resources>
        <Storyboard x:Name="RectangleAnimation">
            <DoubleAnimation Storyboard.TargetName="RectangleTranslate"
                             Storyboard.TargetProperty="X"
                             From="0"
                             To="200" 
                             Duration="00:00:05" />
        </Storyboard>
    </Page.Resources>

    <Grid Background="{ThemeResource ApplicationPageBackgroundThemeBrush}">
        <Rectangle Width="100" Height="100" Fill="Blue">
            <Rectangle.RenderTransform>
                <TranslateTransform x:Name="RectangleTranslate" />
            </Rectangle.RenderTransform>
        </Rectangle>
    </Grid>

    <Page.BottomAppBar>
        <CommandBar>
            <CommandBar.PrimaryCommands>
                <AppBarButton Label="Play" Icon="Play" Command="{Binding Path=StartAnimationCommand}" />
            </CommandBar.PrimaryCommands>
        </CommandBar>
    </Page.BottomAppBar>
</Page>

We have included in the page a Rectangle control and we have applied a TranslateTransform. It’s one of the transformations included in the XAML, which we can use to move a control in the page simply by changing its coordinates on the X and Y axis. The animation we’re going to create will be applied to this transformation and it will change the control’s coordinates.

The animation is defined using a Storyboard as a resource of the page: its type is DoubleAnimation, since it will change a property (the X coordinate of the TranslateTransform) which is represented by a number. The animation will move the rectangle from the coordinate 0 (the From property) to the coordinate 200 (the To property) in 5 seconds (the Duration property). To start this animation, we need to write some code in the code behind: in fact, we have to call the Begin() method of the Storyboardy control and, since it’s a page resource, we can’t access it directly from our ViewModel.

And here comes our problem: the animation can be started only in code behind, but the event that triggers it is raised by a command in the ViewModel. Thanks to our message, we can easily solve it: it’s enough to register the code behind class as receiver of the StartAnimationMessage object we’ve sent from the ViewModel. To do it we use again the Messenger class and its Default instance:

public sealed partial class MainView : Page
{
    public MainView()
    {
        this.InitializeComponent();
        Messenger.Default.Register<StartAnimationMessage>(this, message =>
        {
            RectangleAnimation.Begin();
        });
    }
}

In the constructor of the page we use, this time, the Register<T>() method to turn the code behind class into a receiver. Also in this case, as T, we specify the type of message we want to receive; every other message’s type will be ignored. Moreover, the method requires two parameters:

  1. The first one is a reference to the class that will handle the message. In most of the cases, it’s the same class where we’re writing the code, so we simply use the this keyword.
  2. An Action, which defines the code to execute when the message is received. As you can see in the sample (defined with an anonymous method) we get also a reference to the message object, so we can easily access to its properties if we have defined one or more of them to store some data. However, this isn’t our case: we just call the Begin() method of our Storyboard.

Our job is done: now if we launch the application and we press the button, the ViewModel will broadcast a StartAnimationMessage package. However, since only the code behind class of our main page subscribed to it, it will be the only one to receive it and to be able to handle it.

Be careful!

When you work with messages, it’s important to remember that you may have configured your application to keep some pages in cache. This means that if we have configured a ViewModel or a code behind class to receive one or more messages, they may be albe to receive them even if they’re not visible at the moment. This can lead to some concurrency problems: the message we have sent may be received by a different class than the one we expect.

For this reason, the Messenger class offers a method called Unsubscribe<T>() to stop receiving messages which type is T. Typically, when you need to intercept messages in a code behind class, you need to remember to call it in the OnNavigatedFrom() event, so that when the user leaves the page it will stop receiving messages.

protected override void OnNavigatedFrom(NavigationEventArgs e)
{
    Messenger.Default.Unregister<StartAnimationMessage>(this);
}

For the same reason, it’s also better to move the Register<T>() method from the constructor to the OnNavigatedTo() method of the page, to make sure that when the user navigates again to the page it will be able to receive messages again.

Working with threads

The user interface of Universal Windows app is managed by a single thread, called UI Thread. It’s critical to keep this thread as free as possible; if we start to perform too many operations on it, the user interface will start to be unresponsive and slow to use. However, at some point, we may need to access to this thread; for example, because we need to display the result of an operation in a control placed in the page. For this reason, most of the Universal Windows Platform APIs are implemented using the async / await pattern, which makes sure that long running operations aren’t performed on the UI thread, leaving it empty to process the user interface and the user interactions. At the same time, the result is automatically returned on the UI thread, so it’s immediately ready to be used by any control in the page.

However, there are some scenario where this dispatching isn’t done automatically. Let’s take, as example, the Geolocator API, which is provided by the Universal Windows Platform to detect the location of the user. If you need to continuosly track the user’s position, the class offers an event called PositionChanged, which you can subscribe with an event handler to get all the information about the detected location (like the coordinates). Let’s build a sample app that starts tracking the user’s position and displays the coordinates in the page. The structure of the project is the same we’ve already used in all the other samples: we’ll have a View (with a Button and a TextBlock) connected to a ViewModel, with a command (to start the detection) and a string property (to display the coordinates).

Please note: the purpose of the next sample is just to show you a scenario where handling the UI thread in the proper way is important. In a real project, using a platform specific API (in this case, the Geolocator one) in a ViewModel isn’t the best approach. We’ll learn more in the next post.

Here is how the ViewModel looks like:

public class MainViewModel: ViewModelBase
{
    private readonly Geolocator _geolocator;

    public MainViewModel()
    {
        _geolocator = new Geolocator();
        _geolocator.DesiredAccuracy = PositionAccuracy.High;
        _geolocator.MovementThreshold = 50;
    }

    private string _coordinates;

    public string Coordinates
    {
        get { return _coordinates; }
        set { Set(ref _coordinates, value); }
    }

    private RelayCommand _startGeolocationCommand;

    public RelayCommand StartGeolocationCommand
    {
        get
        {
            if (_startGeolocationCommand == null)
            {
                _startGeolocationCommand = new RelayCommand(() =>
                {
                    _geolocator.PositionChanged += _geolocator_PositionChanged;
                });
            }

            return _startGeolocationCommand;
        }
    }

    private void _geolocator_PositionChanged(Geolocator sender, PositionChangedEventArgs args)
    {
        Coordinates =
            $"{args.Position.Coordinate.Point.Position.Latitude}, {args.Position.Coordinate.Point.Position.Longitude}";
    }
}


When the ViewModel is created, we initialize the Geolocator class required to interact with the location services of the phone. Then, in the StartGeolocationCommand, we define an action that subscribes to the PositionChanged event of the Geolocator: from now on, the device will start detecting the location of the user and will trigger the event every time the position changes. In the event handler we set the Coordinates property with a string, which is the combination of the Latitude and Longitude properties returned by the handler.

The View is very simple: it’s just a Button (connected to the StartGeolocationCommand property) and a TextBlock (connected to the Message property).

<Page
    x:Class="MVVMLight.Dispatcher.Views.MainPage"
    xmlns="http://schemas.microsoft.com/winfx/2006/xaml/presentation"
    xmlns:x="http://schemas.microsoft.com/winfx/2006/xaml"
    xmlns:local="using:MVVMLight.Dispatcher"
    xmlns:d="http://schemas.microsoft.com/expression/blend/2008"
    xmlns:mc="http://schemas.openxmlformats.org/markup-compatibility/2006"
    DataContext="{Binding Source={StaticResource Locator}, Path=Main}"
    mc:Ignorable="d">

    <Grid Background="{ThemeResource ApplicationPageBackgroundThemeBrush}">
        <StackPanel HorizontalAlignment="Center"
                    VerticalAlignment="Center">
            <Button Content="Start geolocalization" Command="{Binding Path=StartGeolocationCommand}" />
            <TextBlock HorizontalAlignment="Center"
                   VerticalAlignment="Center"
                   Text="{Binding Path=Coordinates}" />
        </StackPanel>
    </Grid>
</Page>

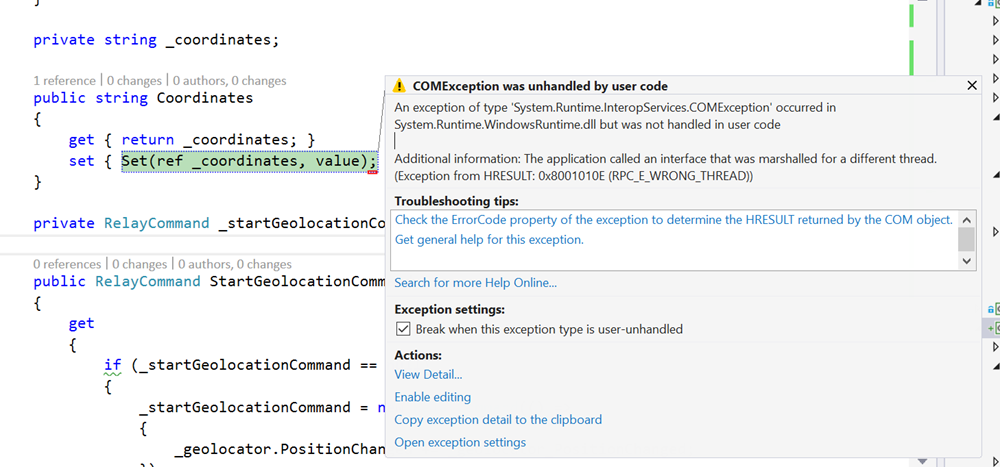
If we try the application and we press the button, we will notice that, after a few seconds, Visual Studio will show an error like this:

dispatcher


The reason is that, to keep the UI thread free, the event handler called PositionChanged is executed on a different thread than the UI one, which doesn’t have direct access to the UI one. Since the Coordinates property is connected using binding to a control in the page, as soon as we try to change its value we’ll get the exception displayed in the picture.

For these scenarios the Universal Windows Platform provides a class called Dispatcher, which is able to dispatch an operation on the UI thread, no matter which is the thread where it’s being executed. The problem is that, typically, this class can be accessed only from code-behind, making harder to use it from a ViewModel. Consequently, most of the MVVM toolkits provide a way to access to dispatcher also from a ViewModel. In MVVM Light, this way is represented by the DispatcherHelper class, which requires to be initialized when the app starts in the OnLaunched() method of the App class:

protected override void OnLaunched(LaunchActivatedEventArgs e)
{
    Frame rootFrame = Window.Current.Content as Frame;

    // Do not repeat app initialization when the Window already has content,
    // just ensure that the window is active
    if (rootFrame == null)
    {
        // Create a Frame to act as the navigation context and navigate to the first page
        rootFrame = new Frame();

        rootFrame.NavigationFailed += OnNavigationFailed;
        DispatcherHelper.Initialize();

        if (e.PreviousExecutionState == ApplicationExecutionState.Terminated)
        {
            //TODO: Load state from previously suspended application
        }

        // Place the frame in the current Window
        Window.Current.Content = rootFrame;
    }

    if (rootFrame.Content == null)
    {
        // When the navigation stack isn't restored navigate to the first page,
        // configuring the new page by passing required information as a navigation
        // parameter
        rootFrame.Navigate(typeof(Views.MainPage), e.Arguments);
    }
    // Ensure the current window is active
    Window.Current.Activate();
}

DispatcherHelper is a static class, so you can directly call the Initialize() method without having to create a new instance. Now that it’s initialized, you can start using it in your ViewModels:

private async void _geolocator_PositionChanged(Geolocator sender, PositionChangedEventArgs args)
{
    await DispatcherHelper.RunAsync(() =>
    {
        Coordinates =
            $"{args.Position.Coordinate.Point.Position.Latitude}, {args.Position.Coordinate.Point.Position.Longitude}";
    });
}

The code that needs to be executed in the UI thread is wrapped inside an Action, which is passed as parameter of the asynchronous method RunAsync(). To keep the UI thread as free as possible, it’s important to wrap inside this action only the code that  actually needs to be executed on the UI thread and not other logic. For example, if we would have needed to perform some additional operations before setting the Coordinates property (like converting the coordinates in a civic address), we would have performed it outside the RunAsync() method.

In the next post

In the next and last post of the series we’re going to see some additional libraries and helpers that we can combine with MVVM Light to make our life easier when it comes to develop a Universal Windows app. In the meantime, as usual, you can play with the sample code used in this post that has been published on my GitHub repository at https://github.com/qmatteoq/UWP-MVVMSamples

Introduction to MVVM – The series

  1. Introduction
  2. The practice
  3. Dependency Injection
  4. Advanced scenarios
  5. Services, helpers and templates
  6. Design time data


Posted in Universal Apps, UWP, wpdev | Tagged , , | 4 Comments

The MVVM pattern – Dependency injection

In the previous posts we’ve learned the basic concepts of the MVVM pattern and how to apply them in a real application. In this post we’ll introduce some more advanced concepts, which will be helpful to implement the MVVM pattern in real and complex projects. We will do it by building a sample application slightly more complex than the one we built in the previous post.

Let’s create a feed reader

To understand what is the dependency injection mentioned in the title of the post we’re going to create an application which will show to the user a list of news retrieved from a RSS feed. As we did in the previous post, the first step is to split the application in the three main components:

  • The model, which is the base entity that identifies a news from the feed.
  • The view, which is the XAML page that will display the news using a ListView control.
  • The ViewModel, which will take care of retrieving the news from the RSS feed and pass it to the View.

Since the goal of the MVVM pattern is to separate, as much as possible, the different layers of the application, it’s a good practice to avoid including the logic required to parse the RSS feed directly in the ViewModel. A better approach is to handle this task to a specific class (we will call it RssService), which will take care of downloading the XML of the RSS feed, turn it into a collection of objects and return it to the ViewModel.

Let’s start with the model and define a class, called FeedItem, which identifies a single news from the feed:

public class FeedItem
{

    public string Title { get; set; }

    public string Description { get; set; }

    public string Link { get; set; }

    public string Content { get; set; }

    public DateTime PublishDate { get; set; }
}

Now we can create the service that, by leveraging LINQ to XML (a powerful language to manipulate XML files included into the framework .NET), is able to parse the RSS feed and convert it into a collection of FeedItem objects:

public class RssService: IRssService
{
    public async Task<List<FeedItem>> GetNews(string url)
    {
        HttpClient client = new HttpClient();
        string result = await client.GetStringAsync(url);
        var xdoc = XDocument.Parse(result);

        return (from item in xdoc.Descendants("item")
        select new FeedItem
        {
            Title = (string)item.Element("title"),
            Description = (string)item.Element("description"),
            Link = (string)item.Element("link"),
            PublishDate = DateTime.Parse((string)item.Element("pubDate"))
        }).ToList();
    }
}


The RssService class has an asynchronous method which uses the HttpClient class and its GetStringAsync() method to download the content of the RSS feed. Then, by using LINQ to XML, we convert the XML into a collection of FeedItem objects: every single node of the XML file (like title, description, link, etc.) is stored into a property of the FeedItem object.

Now we have a class that accepts the URL of a RSS feed in input and returns a list of FeedItem objects, that we can manipulate inside the ViewModel. Here is how the ViewModel of the page that displays the news looks like:

public class MainViewModel: ViewModelBase
{

    private List<FeedItem> _news;

    public List<FeedItem> News
    {
        get { return _news; }
        set { Set(ref _news, value); }
    }

    private RelayCommand _loadCommand;

    public RelayCommand LoadCommand
    {

        get
        {
            if (_loadCommand == null)
            {
                _loadCommand = new RelayCommand(async () =>
                {
                    RssService rssService = new RssService();
                    List<FeedItem> items = await rssService.GetNews("http://wp.qmatteoq.com/rss");
                    News = items;
                });
            }

            return _loadCommand;
        }
    }
}

We have reused the knowledge acquired in the previous posts to:

  1. Define a property called News, which type is List<FeedItem>, where we’re going to store the list of news, that we will display in the page.
  2. We have defined a command, which we can connect to an event (like the button’s click), that creates a new instance of the RssService class and call the GetNews() method.

In the end, we can create the XAML page:

<Page
    x:Class="MVVMLight.Advanced.Views.MainView"
    xmlns="http://schemas.microsoft.com/winfx/2006/xaml/presentation"
    DataContext="{Binding Source={StaticResource ViewModelLocator}, Path=Main}"
    mc:Ignorable="d">

       <Grid Background="{ThemeResource ApplicationPageBackgroundThemeBrush}">
            <ListView ItemsSource="{Binding Path=News}">
                <ListView.ItemTemplate>
                    <DataTemplate>
                        <StackPanel>
                            <TextBlock Text="{Binding Path=PublishDate}" Style="{StaticResource SubtitleTextBlockStyle}" />
                            <TextBlock Text="{Binding Path=Title}" Style="{StaticResource TitleTextBlockStyle}" />
                        </StackPanel>
                    </DataTemplate>
                </ListView.ItemTemplate>
            </ListView>
        </Grid>

    <Page.BottomAppBar>
        <CommandBar>
            <CommandBar.PrimaryCommands>
                <AppBarButton Icon="Refresh" Label="Load" Command="{Binding Path=LoadCommand}" />
            </CommandBar.PrimaryCommands>
        </CommandBar>
    </Page.BottomAppBar>
</Page>


In the page we added:

  1. A ListView control, which ItemsSource property is connected, using binding, to the News property of the ViewModel. When the ViewModel uses the RssService method to load into the News property the list of news, the control will update its visual layout to display them. Specifically, we have defined an ItemTemplate which shows the publishing date of the news and the title.
  2. An AppBarButton in the application bar, which is connected to the LoadCommand propert. When the button is pressed, the ViewModel will download the news from the RSS feed using the RssService class.

Now that we have our new sample application up & running we can introduce some new concepts that will help us to make it better.

Dependency injection

Let’s say that, at some point, we need to replace the RssService class with another one that, instead of retrieving the data from a real RSS feed, generates some fake data to display inside the app. There are many reasons to do it: for example, a designer may have the requirement to work on the user interface and he needs to simulate some “borderline” scenarios, like a news with a very long title. Or maybe our application handles more complex data and, instead of a RSS feed, we have a database or a cloud service which can be hard to configure just for test purposes.

In our sample application, it isn’t that hard to accomplish this goal. We just need to create a new class (for example, FakeRssService) which returns a set of fake FeedItem objects, like the following one:

public class FakeRssService
{
    public Task<List<FeedItem>> GetNews(string url)
    {
        List<FeedItem> items = new List<FeedItem>
        {
            new FeedItem
            {
                PublishDate = new DateTime(2015, 9, 3),
                Title = "Sample news 1"
            },
            new FeedItem
            {
                PublishDate = new DateTime(2015, 9, 4),
                Title = "Sample news 2"
            },
            new FeedItem
            {
                PublishDate = new DateTime(2015, 9, 5),
                Title = "Sample news 3"
            },
            new FeedItem
            {
                PublishDate = new DateTime(2015, 9, 6),
                Title = "Sample news 4"
            }
        };

        return Task.FromResult(items);
    }
}

Then we just need to change the code executed when the LoadCommand is execute to use this new class as replacement of the old one:

private RelayCommand _loadCommand;

public RelayCommand LoadCommand
{

    get
    {
        if (_loadCommand == null)
        {
            _loadCommand = new RelayCommand(async () =>
            {
                FakeRssService rssService = new FakeRssService ();
                List<FeedItem> items = await rssService.GetNews("http://wp.qmatteoq.com/rss");
                News = new ObservableCollection<FeedItem>(items);
            });
        }
        
        return _loadCommand;
    }
}

Up to now, things are quite simple. However, let’s say that we’re working on a more complex application which, instead of having one single page that uses the RssService class, has 30 pages, which means that we have 30 ViewModels that are using the RssService class. Consequently, when we need to replace it with the fake one we’ve just created, we need to edit every single ViewModel and change the used class. You can easily imagine how this approach is time consuming and, most of all, makes easier to introduce errors. It’s enough to forget to replace back the original class in one of the ViewModels when we have finished the testing phase to create a big issue.

Let’s introduce the dependency injection concept, which is a way to handle this scenario in a better way. The problem I have just described raises from the fact that, in the previous approach, the RssService class (which we can consider it as a dependency of the ViewModel, since it can’t work properly without it) was created at build time. With dependency injection, we change approach and we start to solving these dependencies at runtime, when the application is running.

This is possible thanks to a special class, called container, that we can consider like a box: inside it, we’re going to register all the ViewModels and all the dependencies that are required by our application. When the application is running and we need a new instance of a ViewModel (simply because the user is navigating to a new page), we won’t create it anymore manually, but we will ask to the container to do it for us. The container will check if it’s able to solve all the dependencies (which means that all the services used by the ViewModels are available) and, if the answer is yes, it will return to us a new instance of the ViewModel with all the dependencies already solved and ready to be used. Technically speaking, we say that the dependencies are “injected” into to the ViewModel: this is why this technique is called dependency injection.

Why does this approach solve the previous problem, which is avoid to change all the ViewModels if we need to change the implementation of a service? Because the connection between the ViewModel and the service is handled by the container, which is a single instance across the whole application. Every ViewModel won’t have anymore to manually create a new instance of the RssService class, but it will be automatically included in the ViewModel’s constructor. It’s the container’s job to create a new instance of the RssService class and pass it to the ViewModel, so that it can use it. When we need to replace the RssService class with the FakeRssService one, we just need to change the class registered in the container and, automatically, all the ViewModels will start to use the new one.

To properly support this approach, there are a couple of changes we need to make to our application. Let’s see them.

Define an interface

The first problem in our code is that RssService is a class and, as such, we don’t have a way to easily swap it with another one in the container. To do it, we need something that describes in an abstract way the RssService class and the operation that it can perform, so that we can leverage it both in the RssService and in the FakeRssService classes. This is what interfaces are for: their purpose is to describe a set of properties and methods which, in the end, will be implemented by a real class. The first step, consequently, is to create an interface which describes the operations performed by our RSS service. The same interface will be implemented both by the real service (the RssService class) and the fake one (the FakeRssService class). After we’ve done this modify, we’ll be able to:

  1. Reference the service in the ViewModel using the interface instead of the real class.
  2. Register in the container the connection between the interface and the real class that we want to use. At runtime, the container will inject into the ViewModel the implementation we have chosen. If we want to swap it, we just need to register in the container another class for the same interface.

Let’s start by creating an interface and call it IRssService:

public interface IRssService
{
    Task<List<FeedItem>> GetNews(string url);
}

Our service, for the moment, exposes just one asynchronous operation: GetNews(), which takes as input the URL of the RSS feed and returns, as ouput, a collection of FeedItem objects.

Now we need to change our classes RssService and FakeRssService to implement this interface, like in the following example:

public class RssService : IRssService
{

    public async Task<List<FeedItem>> GetNews(string url)
    {
        HttpClient client = new HttpClient();
        string result = await client.GetStringAsync(url);
        var xdoc = XDocument.Parse(result);
        return (from item in xdoc.Descendants("item")
                select new FeedItem
                {
                    Title = (string)item.Element("title"),
                    Description = (string)item.Element("description"),
                    Link = (string)item.Element("link"),
                    PublishDate = DateTime.Parse((string)item.Element("pubDate"))
                }).ToList();
    }
}

public class FakeRssService : IRssService
{
    public Task<List<FeedItem>> GetNews(string url)
    {
        List<FeedItem> items = new List<FeedItem>
    {
        new FeedItem
        {
            PublishDate = new DateTime(2015, 9, 3),
            Title = "Sample news 1"
        },
        new FeedItem
        {
            PublishDate = new DateTime(2015, 9, 4),
            Title = "Sample news 2"
        },
        new FeedItem
        {
            PublishDate = new DateTime(2015, 9, 5),
            Title = "Sample news 3"
        },
        new FeedItem
        {
            PublishDate = new DateTime(2015, 9, 6),
            Title = "Sample news 4"
        }
    };

        return Task.FromResult(items);
    }
}

As you can see, both services are using the same interface and they are implementing the same method: the only difference is that the RssService class is returning real data, while the FakeRssService one is manually creating a set of fake FeedItem objects.

The ViewModel

There are a couple of changes we need to apply to our ViewModel:

  1. We don’t need anymore to manually create a new instance of the RssService class in the command, but we need to add it as parameter in the ViewModel’s constructor. We need to reference the IRssService interface, otherwise we won’t be able to easily swap between its different implementations.
  2. We need to change the LoadCommand, in order to use this new instance of the service.

Here is how our updated ViewModel looks like:

public class MainViewModel : ViewModelBase
{
    private readonly IRssService _rssService;

    public MainViewModel(IRssService rssService)
    {
        _rssService = rssService;
    }

    private ObservableCollection<FeedItem> _news;

    public ObservableCollection<FeedItem> News
    {
        get { return _news; }
        set { Set(ref _news, value); }
    }

    private RelayCommand _loadCommand;

    public RelayCommand LoadCommand
    {
        get
        {
            if (_loadCommand == null)
            {
                _loadCommand = new RelayCommand(async () =>
                {                
                    List<FeedItem> items = await _rssService.GetNews("http://wp.qmatteoq.com/rss");
                    News = new ObservableCollection<FeedItem>(items);
                });
            }

            return _loadCommand;
        }
    }
}

The ViewModelLocator

The last step is also the most important one, which is creating the container and registering into it all the ViewModels with their dependencies. Typically this configuration is done when the app starts so, when we use MVVM Light and the ViewModelLocator approach, the best place where to do it is the ViewModelLocator itself, since it’s the class that takes care of dispatching all the ViewModels.

Here is our new ViewModeloLocator implementation looks like:

public class ViewModelLocator
{

    public ViewModelLocator()
    {
        ServiceLocator.SetLocatorProvider(() => SimpleIoc.Default);
        
        SimpleIoc.Default.Register<IRssService, RssService>();
        SimpleIoc.Default.Register<MainViewModel>();
    }

    public MainViewModel Main
    {
        get { return ServiceLocator.Current.GetInstance<MainViewModel>(); }
    }
}

First of all, we need to higlight that this code is just a sample: there are plenty of available libraries to implement the dependency injection approach, like Ninject or LightInject. However, most of the MVVM toolkits and frameworks provide also an infrastructure to handle this scenario and MVVM Light makes no exception, by providing a simple container identified by the SimpleIoc class, which is set as default container of the app by using the SetLocationProvider() of the ServiceLocator class.

The next step is to register all the ViewModels and theri dependencies in the container. The SimpleIoc class offers the Register() method to achieve this goal, which can be used in two ways:

  1. The Register<T>() version, which is used when we just need to a new instance of a class which isn’t described by an interface. It’s the case of our ViewModels since, in our context, we don’t need a way to completely swap them.
  2. The Register<T, Y>() version, which is used, instead, when we need to register a class that is described by an interface. In this case, we specify as T the interfance and as Y the implementation we want to use.

In the end, we need to change the way the ViewModelLocator class defines the Main property: instead of manually creating a new MainViewModel object, we ask to the container to give us a new instance of the class, by using the GetInstance<T> method (where T is the type we need).

After we have done these changes, here is what we’ll happen when we’ll launch our application again:

  1. The application will create a new instance of the ViewModelLocator class, which will start the configuration of the container. The SimpleIoc class will register the MainViewModel and the RssService classes (the second one, described by the IRssService interface).
  2. The application will trigger the navigation to the main page of the app. Consequently, since the DataContext property of the Page is connected to the Main property of the ViewModelLocator, the locator will try to create a new instance of the ViewModel.
  3. The container defined in the ViewModelLocator class will check if there’s a class which type is MainViewModel registered. The answer is yes, however the class depends from a class that implements the IRssService interface. Consequently, the container will start another search and it will check if there’s a class connected to teh IRssService interface registered. Also in this case the answer is yes: the container will return a new instance of the MainViewModel class with the RssService implementation ready to be used.

If any of the previous conditions isn’t satisfied (for example, the container doesn’t find a class registered for the IRssService interface), we will get an exception, since the container wasn’t able to resolve all the dependencies. Now that we have reached the end of the journey, you should be able to understand why the depenncy injection is extremely useful for our scenario. As soon as we need to do some tests and we want to use the FakeRssService class in replacement of the RssService one, we juest need to change one line of code in the ViewModelLocator class. Instead of:

SimpleIoc.Default.Register<IRssService, RssService>();

we would need to do :

SimpleIoc.Default.Register<IRssService, FakeRssService>();

Thanks to this new approach, it doesn’t matter if our application has just one ViewModel or 50 ViewModels which are dependening from the IRssService interface: automatically, the container will take care of injecting the proper real class to any of them.

This approach is extremely useful not just when you’re doings tests, but also if you need to perform heavy refactoring. Let’s say that, at some point, our application doesn’t have to retrieve the news from a RSS feed anymore, but from a REST service published on the cloud. As long as our new service will follow the same structure defined by the IRssService interface (in our case, a GetNews() method which returns a collection of FeedItem objects) we won’t have to change anything in the ViewModels. We just need to create a new class which implements the IRssService interface and register it into the container, in replacement of the RssService one.

In the next post

We’re reaching the end of our learning path. In the next post we’re going to see some other advances scenarios, like sending messages and handling secondary events. As usual, you can play with the sample project described in this post on GitHub: https://github.com/qmatteoq/UWP-MVVMSamples Happy coding!

Introduction to MVVM – The series

  1. Introduction
  2. The practice
  3. Dependency Injection
  4. Advanced scenarios
  5. Services, helpers and templates
  6. Design time data
Posted in Universal Apps, UWP, wpdev | Tagged , , | Leave a comment