Even if I understand that it may not be the right technology for every project, I’m a huge fan of Xamarin Forms. As you’ll probably know if you follow my blog, I’m a Windows Developer and Xamarin Forms allows me to use basically all my current skills (XAML, binding, MVVM, etc.) to create applications also for other popular mobile platforms like iOS and Android. Additionally, it gives me the chance (like with native Xamarin) to take advantage of platform specific features and, at the same time, to maintain a user experience which is coherent with the look & feel of the operating system.
I’ve recently used Xamarin Forms to create a porting for Android of my simple Qwertee Shirts app and the advantage was clear: I was able to reuse most of the backend code I’ve already wrote for the UWP version and my XAML knowledge but, at the end, I got an application that fully embraced, from a UI point of view, the new Material Design created by Google, so it doesn’t look “alien” like it often happens with cross platform applications based on other cross platform technologies.
 |
 |
However, I’m not only a Windows Developer, but also a MVVM enthusiast and I’ve blogged about this topic multiple times, covering multiple platforms and frameworks. If you’re new to the MVVM pattern, I suggest you to start from this post and move on with the rest of the series. As such, the first thing I did when I decided to resume working with Xamarin Forms to port my app was looking for the best way to reuse my MVVM knowledge to develop the project and, as usual, the choice was hard. In this case, it was even more complicated because Xamarin Forms, compared to other XAML technologies like WPF or UWP, is pretty new, so it was hard to find in the beginning a choice that completely satisfied me.
Don’t get me wrong, if you remember my posts about learning the MVVM pattern, you’ll know that I’m a huge fan of the flexibility offered by MVVM Light and Laurent Bugnion did a superb job to introduce typical MVVM concepts (like binding and commands) in platforms that don’t natively support them, like Android and iOS. However, Xamarin Forms is a bit different than standard Xamarin: it already offers the concepts we need to leverage the MVVM pattern, like binding, data context, dependency properties, behaviors, etc. In this scenario, MVVM Light is still a great choice but, however, you still have to reinvent the wheel to solve many common scenarios you have to deal with when you’re developing a XAML app, like handling navigation, getting access to navigation events in a ViewModel or passing parameters between one page to the other.
Even do it on purpose, right before starting my porting I saw a tweet by Brian Lagunas, one of the MVPs behind the Prism project, announcing a new version of Prism specific for Xamarin Forms. Just to refresh your mind, Prism is a MVVM framework that, originally, was created by the Patterns & Practices division by Microsoft and that, some times ago, has been turned into an open source project driven by the community. Prism has always been a great choice to implement the MVVM pattern in XAML based applications, but sometimes you may have faced the risk to make the project over complicated just to follow its naming conventions and rules (like the requirement of having a bootstrapper to initialize it, despite the fact that XAML based application already have a startup class called App).
After completing the porting, I’ve found myself very satisfied with the Prism approach for Xamarin Forms, so I’ve decided to share my experience with you, hoping that it will get you up & running quicker when you start working on a new Xamarin Forms project.
Creating the first project
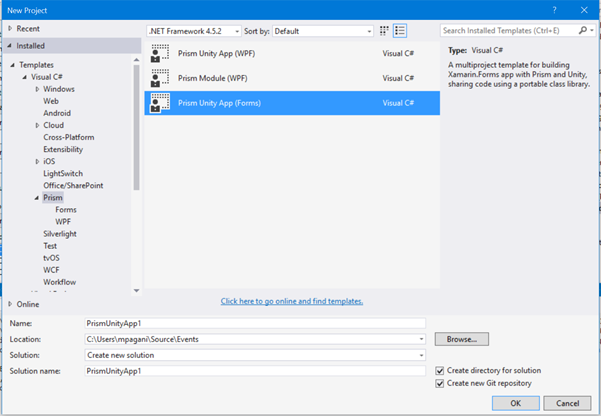
The easiest way to create a Xamarin Forms project based on Prism is to use its own Visual Studio extension, that you can download from the Visual Studio Gallery. After you’ve installed it, you will find in Visual Studio a new section called Prism, with various templates for each supported technology. The template we’re interested into is called Prism Unity App (Forms):
Actually, this template has even an advantage over the standard Xamarin Forms template. As you can see from the image below, it allows you to choose which platform you want to target when you create your project, while the default Xamarin Forms template automatically creates a project for each supported platforms (Android, iOS, Windows Phone 8.1, Windows 8.1, UWP), even if you aren’t interested in targeting one of them.
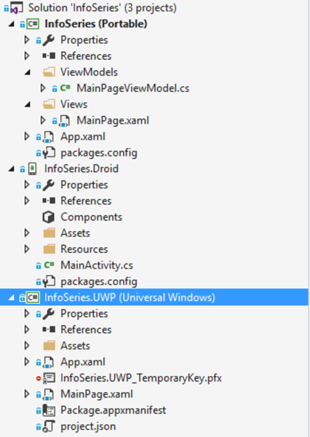
After you’ve hit the Create project, you will end up with a standard Xamarin Forms solution: one Portable Class Library and one specific project for each platform you’ve chosen. Additionally, the Portable Class Library will already contain:
- A Views folder, where to place your pages. The template includes a default one, called MainPage.xaml
- A ViewModels folder, where to place your ViewModels. The templates includes a default one, called MainPageViewModel.cs.
- An App class already configured to initialize the Prism infrastructure.
Here is how your default project will look like:
To demo Prism for Xamarin Forms, I’m going to create a simple client for TrackSeries, a TV Show website created by my great friends and colleagues Adrian Fernandez Garcia and Carlos Jimenez Aliaga.
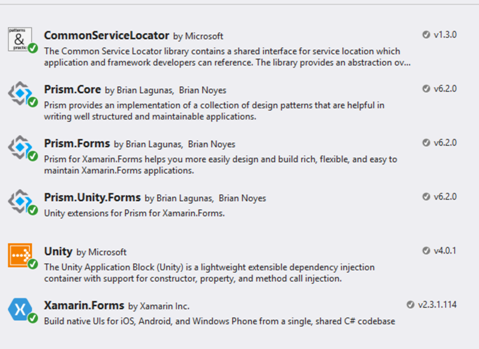
Let’s start from the beginning and see which references have been automatically added by the template to the project:
As you can see, other than the standard Xamarin Forms NuGet package, Prism requires two packages: a Core one (which is in common across every platform) and a Forms one (which, instead, contains the specific helpers and services for Xamarin Forms). By default, the standard template leverages Unity as dependency injection container, so you’ll find installed also a bunch of other packages like Unity, Prism.Unity.Forms and CommonServiceLocator. However, if you don’t like Unity, Prism for Xamarin Forms offers some additional packages to integrate other popular dependency injection containers, like Ninject or Autofac.
The App class
One of the biggest changes compared to the old Prism versions is the removal of the bootstrapper concept, which was a dedicated class of the project that took care of initializing all the Prism infrastructure. Xamarin Forms (as every other XAML technology) already has an initializer class: the App one, which is included in the Portable Class Library, so the team has decided to leverage it instead of asking to the developer to create a new one. By default, this class inherits from the Application class. To properly support Prism, we need to change this and let the App class inherit from the PrismApplication one by:
- In the App.xaml file, adding a new identifier for the namespace Prism.Unity and replacing the root Application node with the PrismApplication one.
<?xml version="1.0" encoding="utf-8" ?>
<prism:PrismApplication xmlns="http://xamarin.com/schemas/2014/forms"
                        xmlns:x="http://schemas.microsoft.com/winfx/2009/xaml"
                        xmlns:prism="clr-namespace:Prism.Unity;assembly=Prism.Unity.Forms"
                        x:Class="InfoSeries.App">

</prism:PrismApplication>
- In the App.xaml.cs file, we need to change the default inheritance from Application to PrismApplication.
public partial class App : PrismApplication
{
    public App(IPlatformInitializer initializer = null) : base(initializer) { }

    protected override void OnInitialized()
    {
        InitializeComponent();

        NavigationService.NavigateAsync("MainPage");
    }

    protected override void RegisterTypes()
    {
        Container.RegisterTypeForNavigation<MainPage>();
    }
}
Additionally, the App class has three distinctive features:
- It has a base constructor, which takes an IPlatformInitializer object as parameter.
- It has a method called OnInitialized(), where we initialize the Forms infrastructure (by calling the InitializeComponent() method) and we trigger the navigation to the main page of the app (we’ll see later in details how navigation works).
- It has a method called RegisterTypes(), which is where we register in the dependency injection container (in this case, Unity) every page and every service required by our application.
The IPlatformInitializer parameter is null by default, but it can be leveraged in case you need to register in the dependency container some specific classes that exists only in a platform specific project. You will find, in fact, that every platform specific project has its own custom initializer class (AndroidInitializer for Android, UwpInitializer for UWP, etc.) which, however, by default has an empty implementation of the RegisterTypes() method. Here is, for example, how the MainPage.xaml.cs of the UWP project looks like:
public sealed partial class MainPage
{
    public MainPage()
    {
        this.InitializeComponent();

        LoadApplication(new DeepNavigation.App(new UwpInitializer()));
    }
}

public class UwpInitializer : IPlatformInitializer
{
    public void RegisterTypes(IUnityContainer container)
    {

    }
}
Connecting Views and ViewModels
As you should already know if you have some previous experience with MVVM , the key to make the pattern working is to connect the ViewModel with its own View through binding. The only difference in a Xamarin Forms app compared to a Windows app is that the property to define the context is called BindingContext and not DataContext. Prism makes use of a simple naming convention to automatically assign a ViewModel to its View:
- The XAML page should be stored into a folder of the project called Views
- The ViewModel should be stored into a folder of the project called ViewModels and it needs to have the same name of the page plus the suffix ViewModel (so, for example, the ViewModel connected to the MainPage.xaml will be called MainPageViewModel).
As you can see, this is the exact infrastructure that the Prism template has created for us. Every page that we add to our application needs to be registered in the container, so that we can properly handle the navigation. To register it, we can leverage the RegisterTypes() method of the App class and use one of the methods offered by the Container called RegisterTypeForNavigation<T>, where T is the type of the page. In the starting template, we have just one page called MainPage, so it’s the only one that is automatically registered when the application starts. Here you can notice probably one of the biggest differences between Prism and other MVVM frameworks. With other toolkits, you are used to register in the container only the ViewModels and, eventually, all the services related to them. With Prism, instead, you just register the page’s type: it’s up to Prism to automatically register in the container also the ViewModel connected to the View. As you can see in the sample code, in fact, we have registered the MainPage class and not the MainPageViewModel one.
If you aren’t a fan of the naming convention approach, you aren’t forced to use it: in fact, the RegisterTypeForNavigation() method has another variant, which signature is RegisterTypeForNavigation<T, Y>(), where T is the page’s type and Y is the ViewModel’s type we want to set as BindingContext. So, for example, if you want to connect your MainPage to a ViewModel called MyCustomViewModel, it’s enough to register it using the following code:
protected override void RegisterTypes()
{
    Container.RegisterTypeForNavigation<MainPage, MyCustomViewModel>();
}
In the OnInitialized() method you can see a preview of how navigation works by default: every time you call the RegisterTypeForNavigation<T> method, Prism registers into the NavigationService a reference to that page using, as key, a string with the same type name. As such, since our page’s type is MainPage, we need to pass the string “MainPage” as parameter of the NavigateAsync() method to trigger the navigation to that page. If, by any chance, we want to override this behavior, we can pass as parameter of the RegisterTypeForNavigation<T>() a custom string and use it for the subsequent navigations, like in the following sample, where we have replaced the key “MainPage” with the “MyCustomPage” one.
public partial class App : PrismApplication
{
    public App(IPlatformInitializer initializer = null) : base(initializer) { }

    protected override void OnInitialized()
    {
        InitializeComponent();

        NavigationService.NavigateAsync("MyCustomPage");
    }

    protected override void RegisterTypes()
    {
        Container.RegisterTypeForNavigation<MainPage>("MyCustomPage");
    }
}
However, in the next posts we’ll see more details about how to handle navigation in a more advanced way.
The ViewModel
One of the features I’ve appreciated most of Prism for Xamarin Forms is that it doesn’t require us to do any change in XAML page to support it (for example, there are other MVVM frameworks which require you to change the ContentPage type with a custom one). You will only find, in the MainPage.xaml file, a specific Prism attribute, as property of the ContentPage entry, called ViewModelLocator.AutowireViewModel:
<?xml version="1.0" encoding="utf-8" ?>
<ContentPage xmlns="http://xamarin.com/schemas/2014/forms"
             xmlns:x="http://schemas.microsoft.com/winfx/2009/xaml"
             xmlns:prism="clr-namespace:Prism.Mvvm;assembly=Prism.Forms"
             prism:ViewModelLocator.AutowireViewModel="True"
             x:Class="InfoSeries.Views.MainPage"
             Title="MainPage">
  <StackLayout HorizontalOptions="Center" VerticalOptions="Center">
    <Label Text="{Binding Title}" />
  </StackLayout>
</ContentPage>
This property takes care of connecting the View with the ViewModel: when it’s set to true, the ViewModel will be automatically set as BindingContext of the View if we have respected the naming convention previously described. However, one of the changes introduced in Prism 6.2 is that this property isn’t required anymore, unless you want to explicitly disable the naming convention by setting it to false. The standard template adds it to give a more complete sample, but you can safely remove it.
A key feature offered by every MVVM framework is a class to use for our ViewModels to give quick access to the most used features, like the implementation of the INotifyPropertyChanged interface. Prism doesn’t make any exception and it offers a class called BindableBase, which our ViewModels can inherit from:
public class MainPageViewModel : BindableBase
{
    private string _title;
    public string Title
    {
        get { return _title; }
        set { SetProperty(ref _title, value); }
    }

    public MainPageViewModel()
    {

    }
}
Thanks to this class, whenever we need to create a property that implements the INotifyPropertyChanged interface (so that it can propagate its changes through the binding channel), we can simply use the SetProperty() method in the setter of the property. This method will take care of storing the value and, at the same time, sending a notification to all the controls that are in binding with this property that its value has changed, so they need to update their layout.
The sample app created by template does exactly this: it creates a property called Title, which is connected through binding to a Label control in the XAML page. Whenever we change the value of the property, we will see the UI updated in real time. To be honest, the sample app shows also something different: it sets the value of the Title property in a method called OnNavigatedTo() and it parses some parameters. We’re going to see how this approach works more in details in the next post.
In the next post
In this post we have just scratched the surface and we understood the basic concept behind a Xamarin Forms application created with Prism. In the next post we’ll see some more advanced concepts, like handling navigation in a ViewModel or registering additional services in the dependency container.


That’s exactly what I was looking for!
Thank you!